
Installation Instructions
Step-by-step guidance with our comprehensive installation instructions to optimize the DIY setup of your new shading net.

#1 SELECT A SUITABLE LOCATION
Determine the most suitable fixing points for the sail’s corners. A minimum fixing height of 2.4m (7’10”) is suggested. Lay out the Silhouette Sail in the area where it is to be erected. The Silhouette Sail length should be 10% smaller than the distance between each fixing point to allow for tensioning.
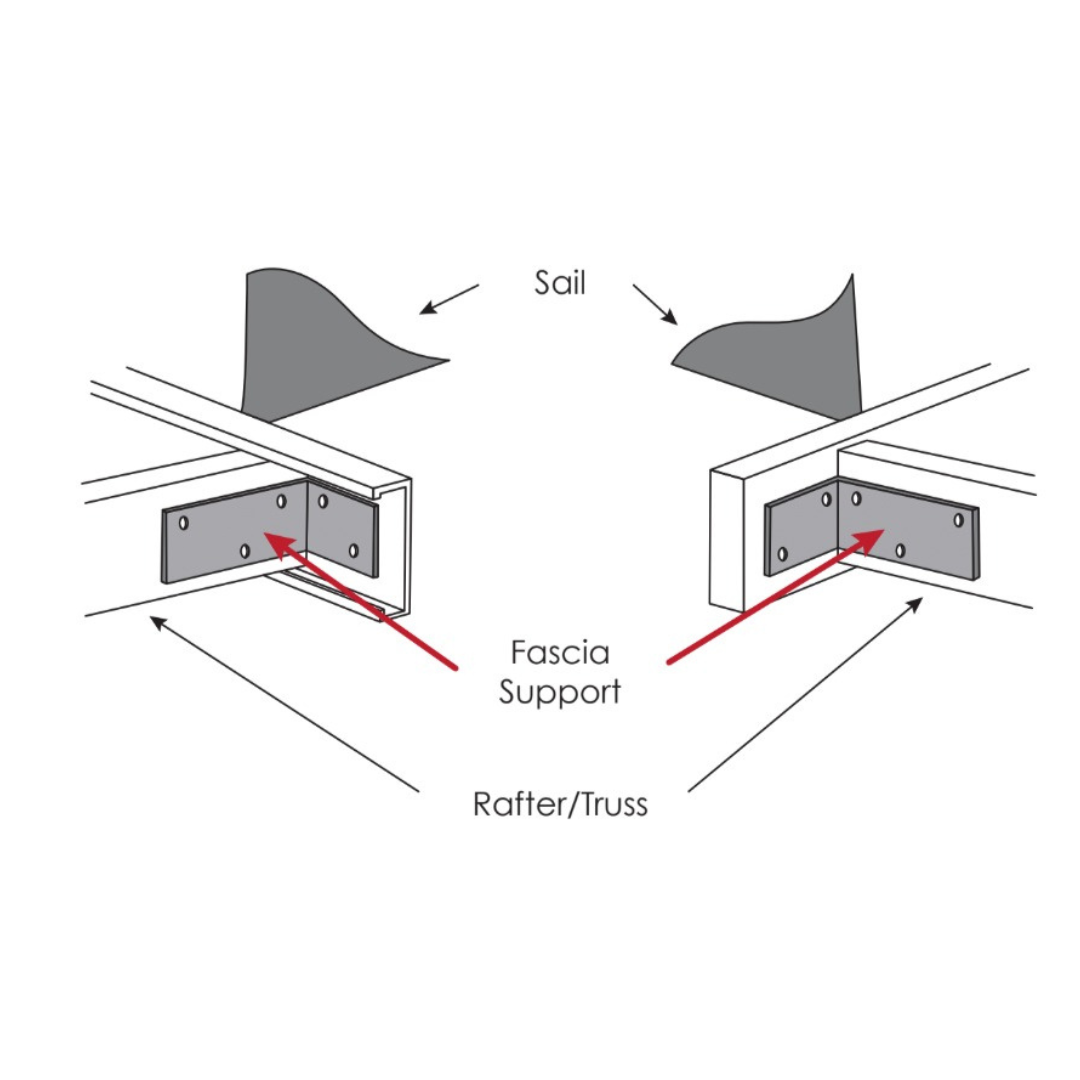
#2 ATTACH TO FASCIA
If you intend to fix your Silhouette Sail to a fascia, the use of a fascia support is strongly recommended. The fascia support is used to reinforce the overhangs of rafters or trusses to provide additional strength. Fascia supports are available from your local hardware store.
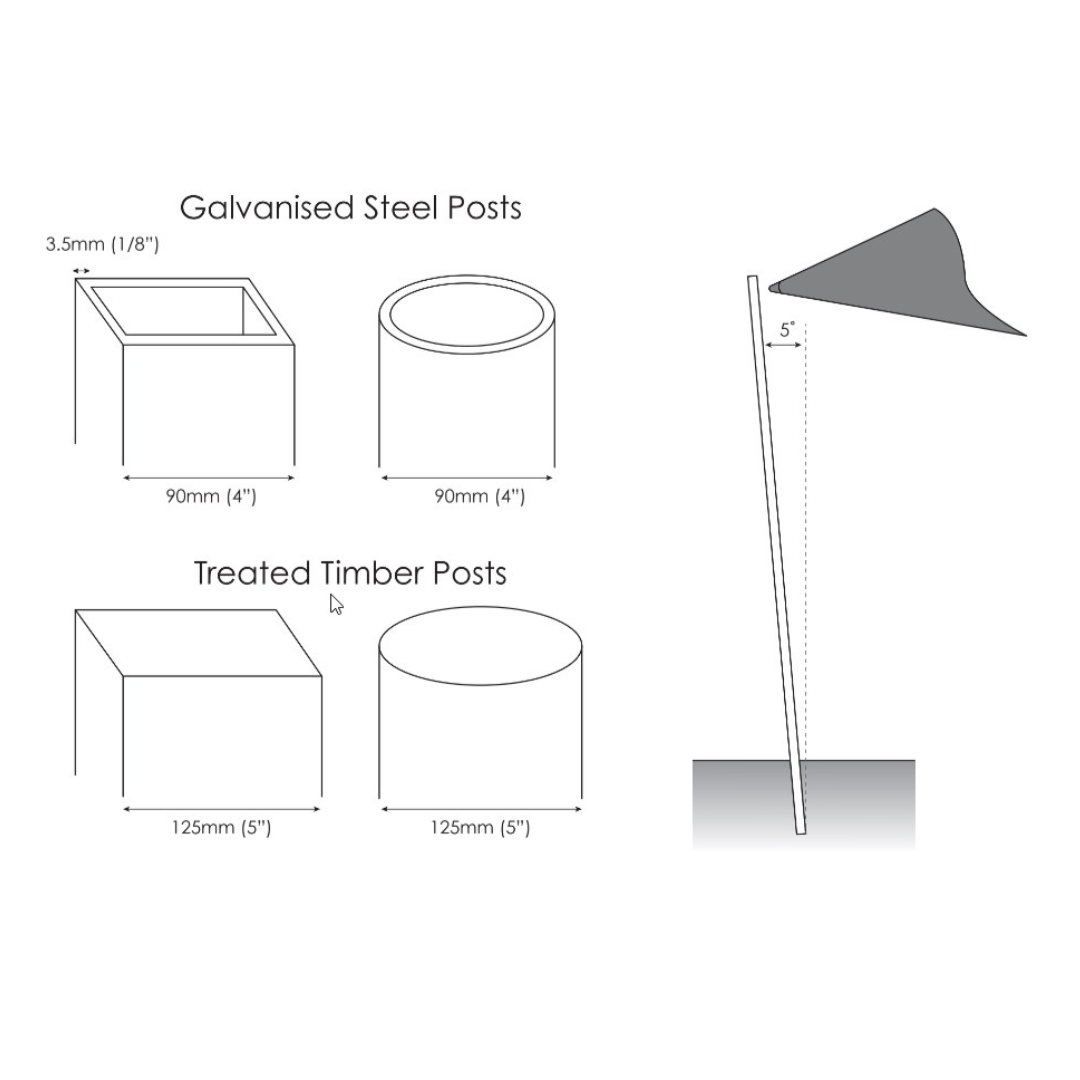
#3 POSTS & VERTICAL SUPPORTS
Steel Posts: Use galvanized or painted steel posts. Steel posts can be cut to predetermined lengths and painted to a colour of your choosing. Use a minimum of 90mm (4”) diameter round or 90mm x 90mm (4” x 4”) square galvanized steel posts with at least 3.5mm (1/8”)thickness. An angle of at least 5 degrees is also recommended for steel posts sloping away from the centre of the Silhouette Sail.
Timber Posts: We recommend the use of a minimum of 125mm (5”)diameter treated timber posts. An angle of at least 5 degrees is recommended for timber posts sloping away from the centre of the Silhouette Sail.
#4 POST HOLES & CONCRETE
-
Step 1
Dig holes with the centre of the hole as the approximate location point of the Silhouette Sail. Dig footing holes as illustrated.
For Silhouette Sails with sides less than 3m (13’) long, dig footing holes 400mm x 400mm (15.5” x 15.5”) square and 800mm (31”) deep. For
Silhouette Sails with sides more than 3m (13’) long, dig footing holes 400mm x 400mm (15.5” x 15.5”) square and 1200mm (47”) deep.
-
Step 2
Firm Ground: Lay a 100mm (4”) depth of 20mm (3/4”) diameter gravel at the base of the post hole. Add concrete and brace post on angle.
Soft Ground: Pour a 100mm (4”) depth of concrete at the bottom of the hole to provide a solid pad. Allow to set. Add gravel, post and the required amount of concrete. Temporarily brace the posts on an angle. Pour concrete to the top of the footing holes ensuring it is packed well. Crown the concrete around the post so that water will drain away and not pool at the base of the post. Allow space at the top of the footing if you are replacing with soil and grass. Brace the posts until the concrete is fully cured, which can take several days, depending on ambient temperature, and humidity levels.


#5 CONNECTING YOUR SILHOUETTE SAIL
-
Use the turnbuckles on two of the Silhouette Sail’s attachment points for proper tensioning. A rope or chain can be used to extend your Silhouette Sail to a fixing point if required. Connect fixing accessories to mounting points as required. Ensure all accessories face towards the middle of the Shadow Sail and are tightly secured. Connect all points, using a strap tensioning tool if necessary to gain increased leverage. Stop tensioning when the Silhouette Sail is taut with little or no creases and does not sag. The tighter the Shadow Sail the less movement which means longer life of the Silhouette Sail. Be careful not to over-tension.


Warnings
Instalation
Prior to Installing, consult your council/local government in regards to any building regulations or approvals which may apply. Temporarily remove your Silhouette Sail during storms and periods of strong winds, snow and adverse weather conditions. This decorative Silhouette Sail is designed to provide shade during the summer, but is not intended to be left in place year round, through severe seasonal weather conditions, which are likely to cause damage to the product. When selecting the position for your Silhouette Sail, ensure all fixing points are structurally sound and fixings are tightly secured. Follow installation instructions and warnings supplied. Silhouette Sail will not support any animals or objects.
Product
This product is NOT FIRE RETARDANT and should be kept away from all sources of ignition, including barbecues, grills, patio heaters or fire pits. NEVER install a source of ignition underneath. Beware of Electrical Cables, Telecoms or Water Pipes. For private domestic use only, this Silhouette Sail is not intended for use in public places and commercial premises This product creates a dappled moving silhouette and will not fully protect against exposure to UV. Extra UV protection is recommended for exposed skin. Do not over tension the Silhouette Sail. Do not hang pot-plants, lights or any other weighted objects from your Silhouette Sail.
Inspection
Inspect regularly. Exposure to certain chemicals, e.g. chlorine, can lead to premature breakdown of the fabric.
Instruction Manual
These instructions are only intended as a guide. Installation requirements can vary considerably, depending on soil types, suitability of anchor points, wind conditions and building regulations, etc. If you have any doubts, it is important that you consult a qualified builder or engineer. Archishade accepts no responsibility for faulty installations, as it is impossible for us to be familiar with the conditions in every individual installation. Before beginning your Silhouette Sail installation it is important that you consider a number of factors to ensure the success of shading the desired area, including, but not limited to, the following: Size and shape of the Silhouette Sail Sun direction and prevailing wind conditions. Strength of structures that you intend to use as anchor points, or suitability of positions where you may wish to erect a fixing post. Location of electrical/telephone cables, and plumbing fixtures, such as sprinkler pipes Distance from potential fire hazards, such as a barbecue, grill or fire pit Head height and headroom from ground.